Removing acrylic nails can be a simple and effective process if done correctly. Acetone is one of the most reliable methods to dissolve the adhesive used in acrylic nails. However, it's essential to follow proper techniques to avoid damaging your natural nails or skin.
Acrylic nails are a popular choice for those who want strong, long-lasting nails. But when it comes to removing them, many people are unsure about the safest and most efficient methods. Using acetone is a time-tested technique that ensures your nails remain healthy and intact.
In this article, we will explore the process of how to remove acrylics with acetone step by step, including tips and tricks to make the process smoother. Whether you're a beginner or someone looking for professional advice, this guide will provide everything you need to know.
Read also:Mt Charleston Weather By Month Your Comprehensive Guide
Table of Contents
- Introduction to Acrylic Nails
- Why Use Acetone?
- Preparing Your Tools
- Step-by-Step Process
- Tips for Removal
- Common Mistakes to Avoid
- Alternatives to Acetone
- Caring for Your Nails After Removal
- Frequently Asked Questions
- Conclusion
Introduction to Acrylic Nails
Acrylic nails have been a staple in the beauty industry for decades. They provide a durable, long-lasting option for individuals who want strong and stylish nails. However, like any cosmetic enhancement, acrylics require proper maintenance and removal to ensure the health of your natural nails.
Understanding Acrylic Nail Composition
Acrylic nails are made from a combination of liquid monomer and powder polymer. When mixed, they create a hard, durable surface that bonds to your natural nails. Over time, these acrylics can wear out or become damaged, necessitating their removal.
Why Proper Removal is Important
Improper removal of acrylic nails can lead to damage to your natural nails, including weakening or peeling. Using acetone is one of the safest and most effective methods to dissolve the adhesive while minimizing harm to your nail bed.
Why Use Acetone?
Acetone is a powerful solvent that effectively breaks down the adhesive used in acrylic nails. It is widely available, affordable, and easy to use, making it the go-to choice for nail removal.
Benefits of Acetone
- Effectively dissolves acrylic adhesive
- Readily available in most drugstores
- Non-toxic when used properly
Potential Drawbacks
While acetone is effective, it can dry out your skin and nails if used excessively. It's important to moisturize after the removal process to counteract this effect.
Preparing Your Tools
Before beginning the removal process, it's crucial to gather all the necessary tools. Proper preparation ensures a smooth and efficient experience.
Read also:High Energy Rock Songs The Ultimate Guide To Boost Your Mood
Tools You Will Need
- Acetone-based nail polish remover
- Cotton balls or pads
- Aluminum foil or cotton wraps
- Cuticle pusher or orangewood stick
- Nail file
- Cuticle oil or hand cream
Tips for Preparation
Ensure your workspace is clean and well-ventilated. Acetone fumes can be strong, so it's essential to work in a well-aerated area.
Step-by-Step Process
Now that you have all your tools ready, let's dive into the step-by-step process of how to remove acrylics with acetone.
Step 1: Soften the Acrylic
Begin by filing the surface of your acrylic nails to remove any shine or topcoat. This helps the acetone penetrate more effectively.
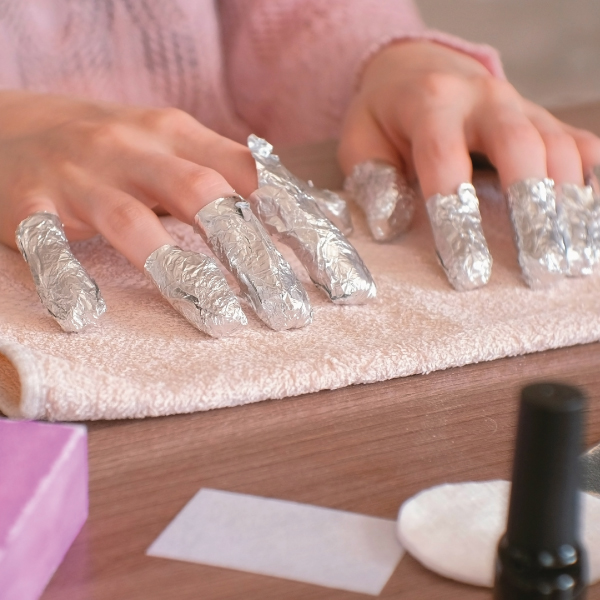
Step 2: Apply Acetone
Soak a cotton ball or pad in acetone and place it on each nail. Wrap the cotton with aluminum foil or use cotton wraps to secure it in place.
Step 3: Wait for the Acrylic to Dissolve
Let the acetone sit on your nails for 10-15 minutes. During this time, the acrylic will begin to soften and lift from your natural nails.
Step 4: Gently Remove the Acrylic
Using a cuticle pusher or orangewood stick, gently push the softened acrylic off your nails. Be careful not to force it, as this can damage your natural nails.
Tips for Removal
Here are some additional tips to make the removal process easier and more efficient:
- Moisten your cuticles before starting to prevent dryness
- Use fresh acetone for better results
- Take breaks if the process becomes uncomfortable
How to Avoid Pain During Removal
Some people may experience mild discomfort during the removal process. To minimize this, ensure your nails are well-moisturized and avoid leaving the acetone on for too long.
Common Mistakes to Avoid
While removing acrylic nails with acetone is generally straightforward, there are some common mistakes to watch out for:
- Using non-acetone remover, which is ineffective for acrylics
- Leaving acetone on for too long, which can damage your skin
- Forcing the acrylic off, which can harm your natural nails
How to Fix Mistakes
If you make a mistake during the removal process, don't panic. Simply clean the affected area, reapply fresh acetone, and proceed carefully.
Alternatives to Acetone
While acetone is the most effective solvent for acrylic nails, some people may prefer alternatives due to skin sensitivity or other concerns. Here are a few options:
Non-Acetone Nail Polish Removers
These are less harsh on the skin but may require more time and effort to remove acrylics.
Home Remedies
Some individuals use household items like olive oil or baking soda to soften acrylics, though these methods are less reliable.
Caring for Your Nails After Removal
After removing your acrylics, it's important to care for your natural nails to promote healthy regrowth. Here are some tips:
Moisturize Regularly
Use a cuticle oil or hand cream to keep your nails and skin hydrated.
Avoid Harsh Chemicals
Give your nails a break from strong chemicals and let them breathe.
File and Shape Your Nails
Gently file your nails into a natural shape to maintain a polished look.
Frequently Asked Questions
How long does it take to remove acrylic nails with acetone?
On average, the process takes about 30-45 minutes, depending on the thickness of the acrylics.
Can I reuse my acetone after removing acrylics?
It's best to use fresh acetone for optimal results. Reusing acetone can reduce its effectiveness.
Is it safe to remove acrylics at home?
Yes, as long as you follow proper techniques and take necessary precautions.
Conclusion
Removing acrylic nails with acetone is a safe and effective method when done correctly. By following the steps outlined in this guide, you can ensure a smooth and hassle-free experience. Remember to care for your natural nails afterward to maintain their health and beauty.
We invite you to share your thoughts and experiences in the comments below. If you found this article helpful, consider sharing it with others who may benefit from the information. For more tips and advice on nail care, explore our other articles on the site.