SSH to Raspberry Pi over the internet is a powerful technique that allows you to remotely access and manage your Raspberry Pi from anywhere in the world. Whether you're a developer, hobbyist, or IT professional, having remote access to your Raspberry Pi can significantly enhance your productivity and flexibility. In this comprehensive guide, we will walk you through everything you need to know about setting up SSH on your Raspberry Pi for internet access.
Remote access via SSH is not only convenient but also secure when configured correctly. However, it requires a thorough understanding of networking, security protocols, and best practices. This guide will cover all aspects, from the basics of SSH to advanced configurations, ensuring you have a seamless experience.
By the end of this article, you'll be equipped with the knowledge to securely connect to your Raspberry Pi over the internet, troubleshoot common issues, and optimize your setup for maximum efficiency. Let's dive in!
Read also:Amc Theatres Merchants Crossing 16 Your Ultimate Guide To Entertainment
Table of Contents
- Introduction to SSH
- Why Use SSH?
- Preparing Your Raspberry Pi
- Enabling SSH on Raspberry Pi
- Connecting Locally
- Connecting Over the Internet
- Securing Your SSH Connection
- Troubleshooting SSH
- Advanced SSH Configurations
- Conclusion
Introduction to SSH
SSH, or Secure Shell, is a cryptographic network protocol designed for secure data communication between computers. It provides a secure way to access remote systems, execute commands, transfer files, and manage configurations over an encrypted connection. SSH is widely used in the tech industry due to its robust security features and versatility.
When you want to SSH to Raspberry Pi over the internet, you are essentially creating a secure tunnel that allows you to interact with your device remotely. This is particularly useful if your Raspberry Pi is located in a different physical location or if you need to access it while traveling.
How Does SSH Work?
SSH operates by establishing a secure connection between a client (your computer) and a server (your Raspberry Pi). The protocol uses encryption algorithms to protect data in transit, ensuring that sensitive information such as passwords and commands remain confidential.
- Encryption: SSH encrypts all data exchanged between the client and server.
- Authentication: Users must authenticate themselves using passwords or public key cryptography.
- Port: By default, SSH uses port 22 for communication.
Why Use SSH?
There are several compelling reasons why you should consider using SSH to connect to your Raspberry Pi over the internet:
Convenience
SSH allows you to manage your Raspberry Pi remotely without needing physical access to the device. This is especially beneficial if your Raspberry Pi is part of a home automation system or a remote server.
Security
Unlike other remote access protocols, SSH provides end-to-end encryption, making it a secure choice for transmitting sensitive data. Additionally, SSH supports advanced authentication methods such as public key authentication, which enhances security further.
Read also:Delaware County Title Office A Comprehensive Guide To Property Transactions
Versatility
SSH can be used for a variety of tasks, including running commands, transferring files, and setting up secure tunnels for other applications. Its flexibility makes it an essential tool for anyone working with Linux-based systems like Raspberry Pi.
Preparing Your Raspberry Pi
Before you can SSH to Raspberry Pi over the internet, you need to ensure that your Raspberry Pi is properly set up and configured. Follow these steps to prepare your device:
Update Your Raspberry Pi
Start by updating your Raspberry Pi's operating system to ensure you have the latest security patches and features.
Run the following commands in the terminal:
sudo apt update
sudo apt upgrade
Check Network Configuration
Ensure that your Raspberry Pi is connected to the internet and has a stable IP address. You can check your IP address by running:
hostname -I
Enabling SSH on Raspberry Pi
By default, SSH is disabled on Raspberry Pi for security reasons. To enable it, follow these steps:
Using Raspberry Pi Configuration Tool
Open the Raspberry Pi Configuration tool from the Preferences menu and navigate to the Interfaces tab. Enable SSH and click OK to apply the changes.
Using the Command Line
Alternatively, you can enable SSH using the command line:
sudo systemctl enable ssh
sudo systemctl start ssh
Connecting Locally
Before attempting to SSH to Raspberry Pi over the internet, it's a good idea to test your connection locally to ensure everything is working correctly.
Find Your Raspberry Pi's IP Address
Use the hostname -I command to find your Raspberry Pi's IP address. Once you have the IP address, you can use an SSH client on your computer to connect.
Connecting with an SSH Client
Open your SSH client (such as PuTTY on Windows or the built-in terminal on macOS and Linux) and enter the following command:
ssh pi@
Enter your Raspberry Pi's password when prompted.
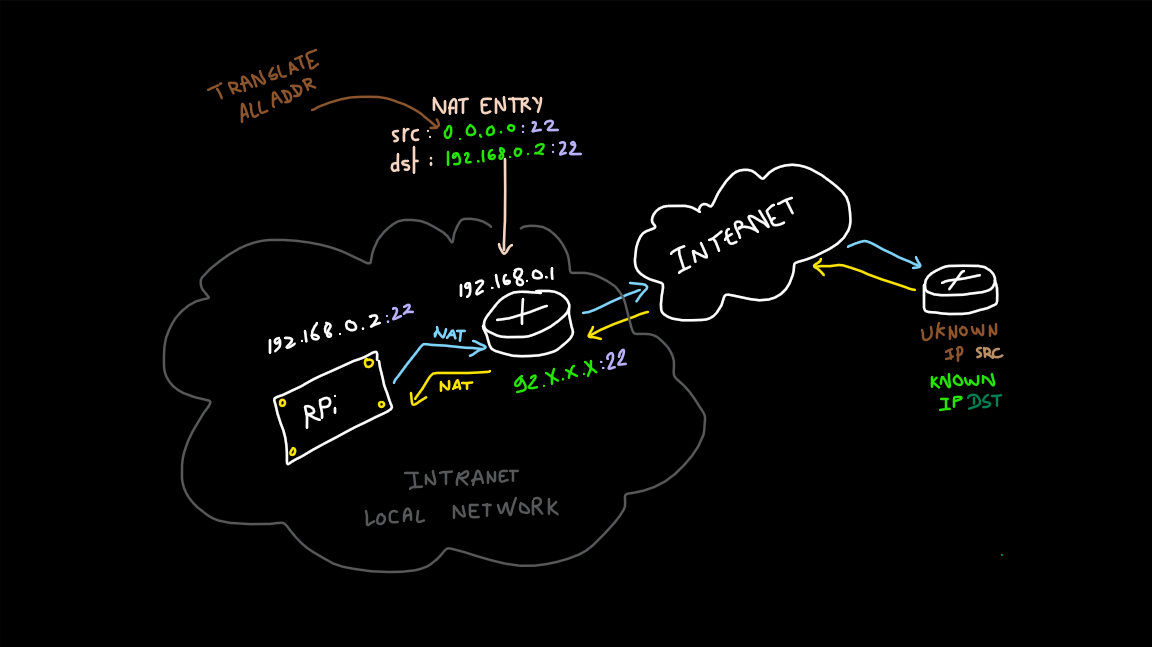
Connecting Over the Internet
Once you've confirmed that SSH works locally, it's time to set up your Raspberry Pi for internet access. This process involves configuring port forwarding, setting up a static IP address, and possibly using a dynamic DNS service.
Port Forwarding
Port forwarding allows external devices to access your Raspberry Pi through your router. Log in to your router's admin panel and forward port 22 to your Raspberry Pi's internal IP address.
Static IP Address
To ensure consistent access, assign a static IP address to your Raspberry Pi. This can usually be done through your router's DHCP settings or by configuring it directly on your Raspberry Pi.
Dynamic DNS
If your internet service provider assigns a dynamic IP address, consider using a dynamic DNS service to maintain a consistent domain name for your Raspberry Pi.
Securing Your SSH Connection
Security is paramount when SSH to Raspberry Pi over the internet. Follow these best practices to protect your device:
Change the Default SSH Port
Changing the default SSH port from 22 to a non-standard port can help reduce the risk of brute-force attacks.
Use Public Key Authentication
Disable password-based authentication and use public key authentication instead. This method is more secure and less susceptible to password guessing attacks.
Limit User Access
Restrict SSH access to specific users or IP addresses to minimize the attack surface.
Troubleshooting SSH
Even with careful setup, issues can arise when SSH to Raspberry Pi over the internet. Here are some common problems and solutions:
Connection Refused
This error usually indicates that SSH is not enabled or the port is blocked. Double-check your SSH configuration and port forwarding settings.
Timeout Errors
Timeouts can occur due to network issues or incorrect IP addresses. Verify your Raspberry Pi's IP address and ensure your router is properly configured.
Authentication Failed
If you're unable to log in, ensure you're using the correct username and password or check your public key settings.
Advanced SSH Configurations
For advanced users, there are several additional configurations you can implement to enhance your SSH experience:
Tunneling
SSH tunneling allows you to securely forward traffic from one network to another. This is useful for accessing services behind firewalls or securing sensitive data.
SSH Config File
Create an SSH config file to store frequently used connection settings, making it easier to connect to multiple devices.
SSH Key Management
Learn how to manage SSH keys effectively, including generating new keys, revoking compromised keys, and storing them securely.
Conclusion
SSH to Raspberry Pi over the internet is a powerful and secure way to manage your device remotely. By following the steps outlined in this guide, you can set up a robust SSH connection that meets your needs while maintaining high levels of security.
We encourage you to experiment with advanced configurations and explore the full potential of SSH. If you found this article helpful, please share it with others or leave a comment below. For more tips and tutorials, explore our other articles on Raspberry Pi and related technologies.