Taking screenshots or screen snips on a Chromebook is an essential skill for students, professionals, and casual users alike. Whether you need to capture important information, share visuals, or document processes, knowing how to snip on a Chromebook can save you time and effort. In this guide, we'll walk you through everything you need to know about taking screenshots, screen snips, and even editing them on your Chromebook.
As Chromebooks continue to grow in popularity, many users are discovering the versatility and ease of use these devices offer. However, some functionalities, such as taking screen snips, may not be immediately obvious. That's why we've created this detailed guide to help you master the art of capturing and editing screen snippets on your Chromebook.
By the end of this article, you'll have a clear understanding of the various methods to snip on a Chromebook, including keyboard shortcuts, using built-in tools, and leveraging third-party apps. Let's dive in and explore how you can take full control of your Chromebook's screenshot capabilities.
Read also:Civil Coffee Highland Park Your Ultimate Coffee Destination
Table of Contents
- Introduction to Screenshots on Chromebooks
- Keyboard Shortcuts for Taking Screenshots
- Using the Screenshot Tool
- Editing Screenshots on Chromebook
- Saving and Sharing Screenshots
- Third-Party Apps for Advanced Snipping
- Tips and Tricks for Better Snipping
- Common Issues and Troubleshooting
- Comparison with Other Devices
- Conclusion and Call to Action
Introduction to Screenshots on Chromebooks
Chromebooks are designed to be user-friendly and efficient, offering a range of built-in features that simplify daily tasks. One such feature is the ability to take screenshots or screen snips with ease. A screenshot captures the entire screen, while a screen snip allows you to select a specific area or window to capture. Both options are invaluable for various purposes, from creating tutorials to documenting errors.
Understanding how to snip on a Chromebook involves familiarizing yourself with keyboard shortcuts, built-in tools, and additional apps that enhance your screenshot-taking experience. This section will provide an overview of these methods and highlight their benefits.
Keyboard Shortcuts for Taking Screenshots
Full Screen Capture
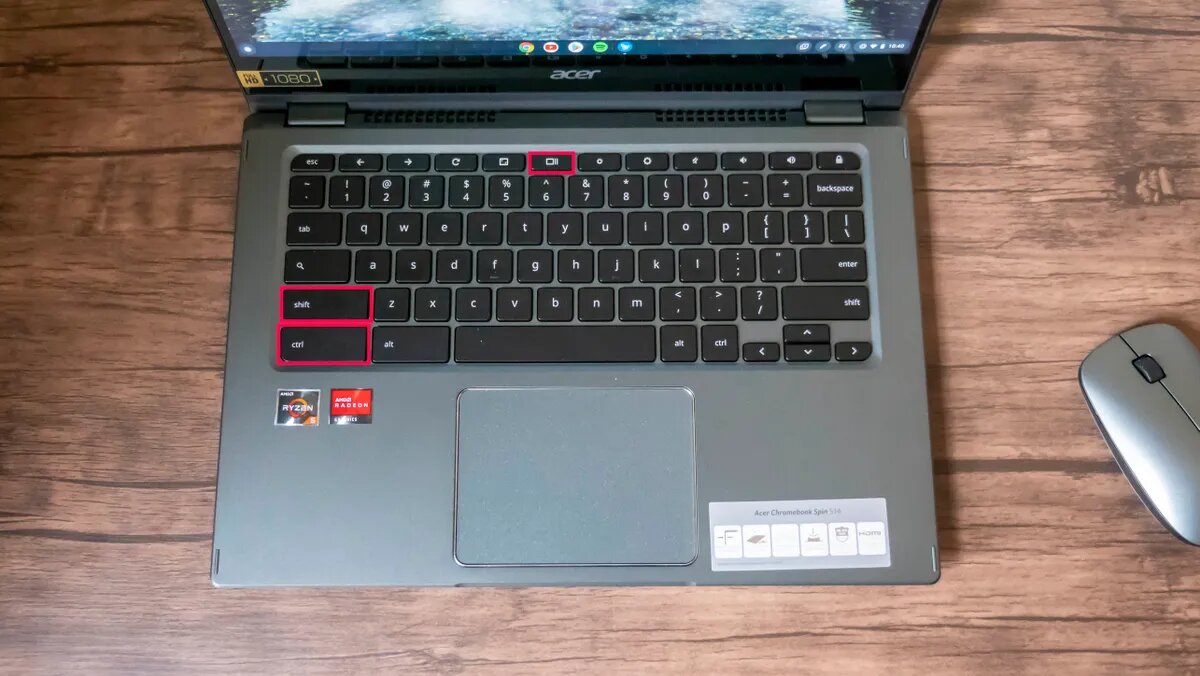
One of the quickest ways to take a screenshot on a Chromebook is by using keyboard shortcuts. To capture the entire screen, simply press the Ctrl key and the Overview key (located where the F5 key is on most keyboards) simultaneously. This action will save a full-screen screenshot to your "Screenshots" folder in the Files app.
Window Capture
If you only need to capture a specific window, you can use the Shift + Ctrl + Overview key combination. This method is particularly useful when you want to focus on a single application or browser tab without including unnecessary elements from your desktop.
Using the Screenshot Tool
Chromebooks come equipped with a built-in Screenshot tool that offers more control over the capturing process. To access this tool, follow these steps:
- Press the
Ctrl+Searchkeys simultaneously to open the Screenshot tool. - Select the "Capture" option to choose between capturing the full screen, a specific window, or a custom region.
- Once you've made your selection, the tool will automatically save the screenshot to your "Screenshots" folder.
This tool is especially useful for users who prefer a more interactive approach to taking screenshots.
Read also:Austin City Limits 2021 Lineup The Ultimate Guide To The Festivals Spectacular Music Event
Editing Screenshots on Chromebook
After taking a screenshot, you might want to edit it before sharing or saving it. Chromebooks offer several options for editing screenshots:
- Google Photos: If you have Google Photos enabled, your screenshots will automatically sync to the cloud. You can use the built-in editor in Google Photos to crop, rotate, and annotate your images.
- Files App: The Files app on your Chromebook includes a basic image editor that allows you to crop, rotate, and adjust brightness levels.
- Third-Party Apps: For more advanced editing capabilities, consider installing apps like Pixlr or Photopea from the Chrome Web Store.
These tools provide flexibility and ensure that your screenshots meet your specific needs.
Saving and Sharing Screenshots
Once you've taken and edited your screenshot, you'll likely want to save or share it. Here's how:
- Saving: All screenshots are automatically saved to the "Screenshots" folder in the Files app. You can organize them further by creating subfolders or renaming the files for better management.
- Sharing: To share your screenshot, you can use Gmail, Google Drive, or any other file-sharing service. Simply drag and drop the file from the Files app into your desired application.
With these options, sharing your screenshots with others is quick and straightforward.
Third-Party Apps for Advanced Snipping
While Chromebooks offer robust built-in tools for taking screenshots, some users may require more advanced features. Third-party apps can enhance your snipping experience by providing additional functionalities such as:
- Custom annotations
- Advanced cropping tools
- Screen recording capabilities
Popular apps like Greenshot, Snagit, and Lightshot are available through the Chrome Web Store and can significantly expand your screenshot-taking capabilities.
Tips and Tricks for Better Snipping
To make the most of your Chromebook's screenshot features, consider these tips:
- Use keyboard shortcuts for faster captures.
- Experiment with the Screenshot tool to discover its full potential.
- Organize your screenshots in the Files app for easy access.
- Regularly back up your screenshots to Google Drive or another cloud storage service.
These tips will help you streamline your workflow and ensure that your screenshots are always accessible when needed.
Common Issues and Troubleshooting
While taking screenshots on a Chromebook is generally straightforward, some users may encounter issues. Common problems include:
- Screenshots not saving to the "Screenshots" folder
- Keyboard shortcuts not working
- Editing tools not functioning properly
To resolve these issues, try restarting your Chromebook, updating your operating system, or reinstalling any third-party apps you're using.
Comparison with Other Devices
Compared to other devices like Windows laptops or MacBooks, Chromebooks offer a unique approach to taking screenshots. While the functionality is similar, Chromebooks excel in simplicity and integration with Google services. For example:
- Automatic syncing with Google Drive
- Seamless integration with Google Photos
- Lightweight and efficient tools
These features make Chromebooks an excellent choice for users who prioritize ease of use and cloud integration.
Conclusion and Call to Action
In conclusion, knowing how to snip on a Chromebook is a valuable skill that can enhance your productivity and streamline your workflow. By mastering keyboard shortcuts, utilizing built-in tools, and exploring third-party apps, you can take full advantage of your Chromebook's screenshot capabilities.
We encourage you to practice these methods and share your experiences in the comments below. Additionally, feel free to explore other articles on our site for more tips and tricks to get the most out of your Chromebook. Happy snipping!